Media: Injected Plastic
Decals: Six aircraft-- two in green/brown/grey camouflage from Kanoya and Misawa Naval Group, and four in green/grey camouflage; two from 705
Naval Group, one from Misawa Naval Group and one from 762 Naval Group.
Date of Review: 2 May 1998
Japan's G4M1 'Betty' Bomber was, like the A6M 'Zero', a brand new weapons system at the beginning of the Pacific War. Blessed with good range, speed, and bomb load (thanks to thin/no armor plating and no self-sealing fuel tanks), it was used effectively in the early part of the war. Its most stunning victory came while helping to sink the battleship Prince of Wales and battlecruiser Repulse in 1941, an action depicted on the box top. Later use in the Guadalcanal campaign showed up its flaws and its tendency to burst into flames when the wing tanks were punctured was a delight amongst Allied fighter pilots. The Japanese crew was less enamoured with this tendency. Despite this, the aircraft was modified and used until the end of the war, G4M1's being used to carry the official surrender delegation to Iwo Jima in 1945.
Tamiya's kit is everything one has come to expect from this innovative company. G4M1's differed little from each other, but all options are in this kit, including exhaust flame dampeners, and weapons loads of either torpedo, bombs, or no loads. The Betty was somewhat unique in that the bomb bay door was
non-functional in flight. This meant the door was removed for bombing missions, and had a panel removed from it for carrying torpedoes. Only for transfer or recce missions was the door on the plane. I chose this last option for mine.
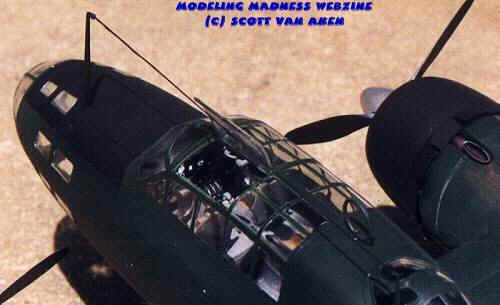
Molded in Tamiya's medium grey plastic, it comes with a very large interior section. All the pieces fit beautifully and the interior includes wing spars to assure the proper positioning of the long main wings. There is also a short spar for the tail and horizontal stabilizers. The interior was painted RLM 02 grey as per instructions. There is a lot of it. The instrument panel decal was used and it fit perfectly; aligning itself with the instruments on the panel. OK, R-M, try that one! All the guns are molded in the stowed position. The upper fuselage gun can be modeled as 'in use' and alternate upper 'turret' transparencies are provided. Once the interior is properly painted and detailed, it is time to glue the transparencies in the fuselage and the fuselage halves together. Take your time and glue it in sections as it is very long and misalignment is possible. I know, I did it in one section! As I mentioned, I did mine as a recce version with the bomb bay door installed. This is probably the poorest fitting part of the kit. The fore section had a tighter circumference than the adjoining fuselage and required a lot of putty to properly fair in. Had I gone
with the bomb load, this would not have been a problem, but the lack of the bomb bay door gives the aircraft a 'broken back' look that I did not like.
Once the fuselage is done, it is time to add the external transparencies. All fit beautifully with no fuss, and this includes the tail section. I just spot-glued the nose and tail transparency so that they could later be removed. Then came the most tedious part of construction; masking all those windows. This would be a great time to try the various pre-cut masks, but I soldiered on with tape and Parafilm M.
Then it was on to the wings, tail and stabilizers. I had no problems at all with them until it came time to the engine nacelles. They did not fit as well as the rest of the kit and needed filling and filing. The gear doors are also part of the engine nacelle and not separate. Some like this feature, some do not. To me, it makes no difference. The main gear is very strong and ingeniously designed to slot into the nacelles. This means you can paint the aircraft and then install the MLG. Very nice indeed. Once all the various parts were completed and masked, it was time to paint.
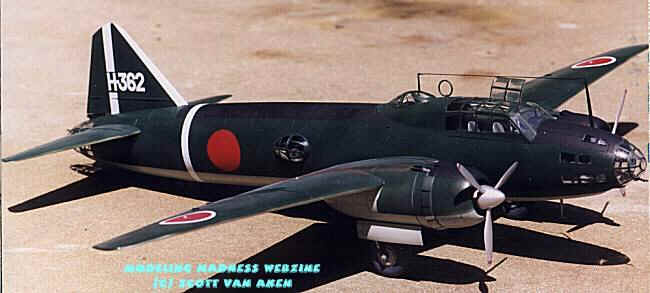
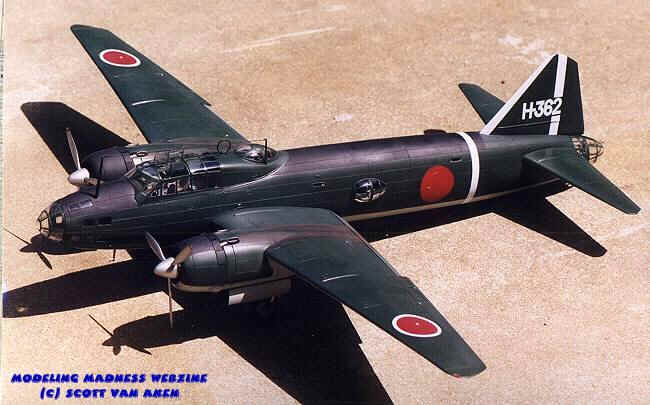
I chose an aircraft from the Misawa Naval Group at Rabaul in 1942 as used in the Guadalcanal Campaign. This was green upper and grey lower with a black anti-glare section on the nose, engines and upper fuselage. It did not carry the yellow wing ID strips. Since it was not necessary to glue the wings and stabilizers on, they were painted separately. Made it a lot easier as this is a very big kit. First to be done was the underside grey. This was done with Xtracolor enamels and dried within about four hours. I gave it 24, just in case. Next the grey was masked and the upper green was done with Tamiya acrylics. When this was dry, it was overpainted with Future to give it a gloss finish. Then the black anti-glare areas were painted on. When dry, they were masked with tape and the green resprayed. I generally have to do several sessions of masking and respraying until all the parts are properly done. Never have been able to do it just once unless it is a single color application.
Once all the paint was dry and properly glossed (except the Xtracolor which goes on gloss), it was time for the decals. They are done by Scalemaster so the colors were very good. Unlike the Scalemaster decals done for ProModeler kits, these were in register (must be better Tamiya Quality control) and quite usable. The downside is that they are slightly transparent and the white markings darkened a bit on the dark green surfaces. The decals responded well to the Microscale system and for those stubborn ones, I used Champ decal set (which just curls normal Hasegawa and normal Tamiya decals). By the way, you are not provided with the thin, red propeller warning stripes, so you'll have to find a source of thin, red stripes.
Once painted and decaled, the airframe sprayed with a semi-matte. Then the tedious job of removing the masking from transparencies began. Gad, what a job.
Finally the he wings and horizontal stabilizers were glued in place, the landing gear and other bits added and there was a gorgeous 1/48 Betty bomber. It is a huge aircraft, as large as a 1/48 DC-3, so you will need a big space to put it in. Fortunately, I have a large display case. It looks good in there with the He-111, A-26 and B-25.
This kit is highly recommended if you have the space for it and can afford the initial cost.