Modeling the Tachikawa Ki-36 and Ki-55 "Ida's" in 1/72 Scale
by
Jack Gartner IPMS #30538 - diaphus@aol.com
IPMS/Pelikan Model Club of the Pinellas Suncoast
St. Petersburg, FL
Historical Info
In response to a directive in 1937 by the Japanese Army Air Ministry, the Tachikawa Hikoki K.K. submitted and won the bid to produce a low wing fixed undercarriage monoplane that was to be used for direct operations (ground attack and liaison).
The initial aircraft design was given the Kitai designation of 36 (Ki-36). The aircraft carried a pilot and one observer/bombardier/gunner in tandem. It was powered by a 450 HP Hitachi Ha-13 nine cylinder engine providing a maximum air speed of 216 mph. Armament included one 7.7mm machine gun offset to the starboard side firing through the cowling, which was aimed with a telescopic sight passing through the canopy, and one rearward firing Type 89 7.7mm machine gun in the observers compartment. Underwing racks could accommodate up to 10 27.5 lb. or 33 lb. bombs (in the last days of the war, one 550 or 1,100 lb. bomb was fitted under the fuselage for kamikaze attacks). In addition to a large greenhouse canopy, clear panels were inset into the undersides of the wings and fuselage to allow the "back-seater" a view of the ground.
In addition to the Ki-36, of which 860 production units were built, Tachikawa also produced a larger number of an unarmed trainer version, designated the Ki-55 (total of 1,077 built). In addition to the removal of the machine guns, the Ki-55 differed from the Ki-36 in the removal of the following: wheel covers (spats) from the fixed gear; radio and antenna; bomb racks; and the fuselage and underwing observation windows were covered. In order to use the Ki-55 in pilot training, a second control panel, stick and rudder assembly were installed in the rear position.
According to the U.S. custom of giving WWII Japanese fighter aircraft men's names, and all other aircraft types women's names, the Ki-36 and Ki-55 both received the code name 'Ida'. Ida's were flown throughout WWII by the Japanese and at least a few of them ended up in several air forces (Indonesia, Thailand and China) and were flown after 1945.
The Kits
Both the Ki-36 and Ki-55 versions of the Ida were released in 1/72nd scale by Fujimi. I am uncertain as to whether the Ki-55 is still in production, although it is a fairly common find at model shows, but the Ki-36 is becoming a rather rare beast. However, since I had both in my collection, I decided to build both simultaneously and report on aspects of their construction.
Both kits come crisply molded with very little flash. The Ki-36 is molded in light gray, the Ki-55 in trainer orange. The canopies were nice, clear and well molded, however, the underwing and fuselage glass panels included in both kits (even though they're absent in the actual Ki-55) had sink marks that were not possible to fix, so these were not used in the Ki-36 construction. The elevators and ailerons have a nicely done fabric finish, as does the rudder which comes as a separately molded piece, something I wish more manufacturers would do with their kits!
The panel lines are fairly accurate and are crisply incised but as with most Fujimi kits, are overdone in terms of both depth and width. I elected not to make any alterations to the lines. There are only a few distinct inaccuracies, the pitot tube (more on that later), and one which was so subtle I didn't notice it until I was decaling. Both upper ailerons have a molded actuator rod. In the actual aircraft, these were symmetrically placed near the center of the aileron. In both kits, the port side control rod is in the proper location, the starboard is distinctly offset towards the centerline. As I said, I didn't notice the discrepancy until I saw that when I positioned my national insignia in exact relation to the actuators, the alignment of the decals was noticeably off! If you're a stickler for such things, correct the problem when you're scribing the aileron attachment seams.
The two versions each have some unique parts. The Ki-36 includes spatted wheels, a hole through the front windscreen for the telescopic sight, the sight, a radio antenna, bombs (10 27.5 lb. for underwing attachment, one 550 lb. for the fuselage centerline if you want to go "kamikaze"), and doors and rails which could be slid across the observers fuselage windows in the actual aircraft. The Ki-55 includes undercarriage parts with the spats removed, and the front windscreen is solid.
Both kits included dual control panels and control columns (not used in the Ki-36), an observers machine gun (not used in Ki-55) and unfortunately, both kits had the underwing openings for the clear panels (as well as the clear parts) plus holes in the wings for the bombs, both of which had to be filled in for the Ki-55 version. In the interior, the instrument panels have finely raised detail so you can produce a nice looking dial face with dry brushing.
Construction
Interior, Engine, Cowling and Canopy - Interior construction in both kits was straightforward. I only made one alteration to the Ki-36, in which the supplied machine gun is crude and of the wrong type. It's molded as a Type 99 gun, similar to the German MG15 with "saddle" type ammo drums. In fact, the gun was a Type 89, similar to the British Lewis gun with a single top mounted ammo drum. I scratchbuilt a new gun out of styrene rod, stainless tubing and brass wire and painted it ModelMaster Flat Black to which I added just a touch of Testor's Metallizer Steel.
The seats and seat backs were slightly deepened with a Dremel tool. Interior surfaces were painted with Xtracolor Japanese Metallic Blue, the seats and control panels in a Model Master British Interior Green that looks quite similar to the green seen on interior fittings in the Air & Space Museum's Zero. Seat belts were painted on using PollyS Antique White, ModelMaster Leather and Chrome Silver. Dial faces were Flat Black dry brushed with Flat White for indicators (ModelMaster for both), and Testor's Sky Blue for the turn and bank indicators and the dial faces were sealed with a drop of Krystal Kleer to simulate dial faces.
The engines were sprayed Model Master Flat Black, as were the cowling interiors, and the crankcase housings were painted Model Master Dark Gull Gray, while the push rods were highlighted in Gloss Black. The prop blades needed only a small amount of cleanup to remove seam lines. On the Ida, props were usually flat black on the rear surfaces and bright silver on the front, with thin red lines near the front tips only. I used Model Master Flat Black, their new Chrome Silver and Insignia Red. For the specific aircraft you're modeling, check your references, as some Ki-36's and Ki-55's had a small spinner on the prop (supplied as a separate kit piece), while others did not. For my subjects, my Ki-55 had the spinner, the Ki-36 did not.
After painting the engines, they were fitted inside the cowlings. The sides of the cowling were vented along the fuselage, so you'll need to thin these areas down quite a bit with a Dremel sanding bit or a file. The fit of the cowling ring to the cowling and the entire assembly to the fuselage were the only parts that gave me problems. The mating of the cowling ring to the main cowling is slightly out of round and needs to be sanded in on one side and slightly built up with putty on the other. At the front of the fuselage is a large tab that fits into a slot on the interior back of the cowling. I recommend cutting the tab entirely off and sanding smooth, as I could not get the cowlings to fit closely against the front of the fuselages otherwise. The exhaust stacks on the sides of the cowling are separate parts (another nice touch!) as is one of the two exhaust tubes beneath the cowling; the other is molded in. I drilled out both exhaust tubes and scribed the rectangular side exhausts. I painted all with Tetsor's Metallizer Burnt Metal and ModelMaster Flat Black inside. I did not attach any exhaust pieces until all painting and detailing was complete.
After the interiors were assembled and the fuselages sealed with Tenax and puttied smooth, I attached the canopies. Before attachment, I masked all windows using 3M Magic Tape, cutting away the frame portions with a brand new #11 X-Acto blade. The interiors of the canopies were given a brushed application of Future Floor Wax. I then attached the canopies with white glue. The fit of the canopy in both kits is superb! After drying, the white glue was rewet with a stiff brush and smoothed down until a perfect seam was produced. After that, a coat of Xtracolor metallic blue was sprayed on as the interior frame color. In the Ki-36 the telescopic sight was not attached until all painting, gloss and flat coating had been completed. It was painted flat black and I drilled out the front and rear of the sight and filled with Krystal Kleer to simulate lenses.
While the Ki-55 lacked a radio and antenna, the Ki-36 had one and this was attached before painting the main canopy color. There is no molded pin or hole for attaching the antenna to the top of the canopy. This did not allow a firm connection between the two parts as I discovered after knocking the antenna off about three times! I finally drilled a tiny hole (#80 bit) in the base of the antenna and top of the canopy, inserted a small piece of brass wire, and reattached. This held up even under the tension applied by the antenna "wire" (smoke colored nylon sewing thread). Antenna wire insulators were small drops of superglue painted with Model Master Flat White.
The Ki-36 also featured small panels on rails that slid back and forth to cover or uncover the observer's fuselage windows. The kit doors were a bit thick and not curved to the fuselage, so I made new ones out of .010 sheet styrene and attached rails made of .020 styrene rod.
Wings, Elevator, Rudder - The fit of these parts to the fuselage and tail were excellent in both kits. Remember when joining the elevators and wings to the fuselage that the Ida, like many Japanese a/c, had distinct join lines at the wing and elevator roots which look just like the other panel lines and these should be apparent on the finished model!
As mentioned previously, the Ki-55 underwing windows were faired over in the actual a/c, so you'll need to close them up if you're building this version. I superglued the supplied clear window pieces into the appropriate holes and then filled the gaps with superglue and putty and sanded smooth. At the same time, I puttied in the attachment holes for the bombs and sanded them smooth as well.
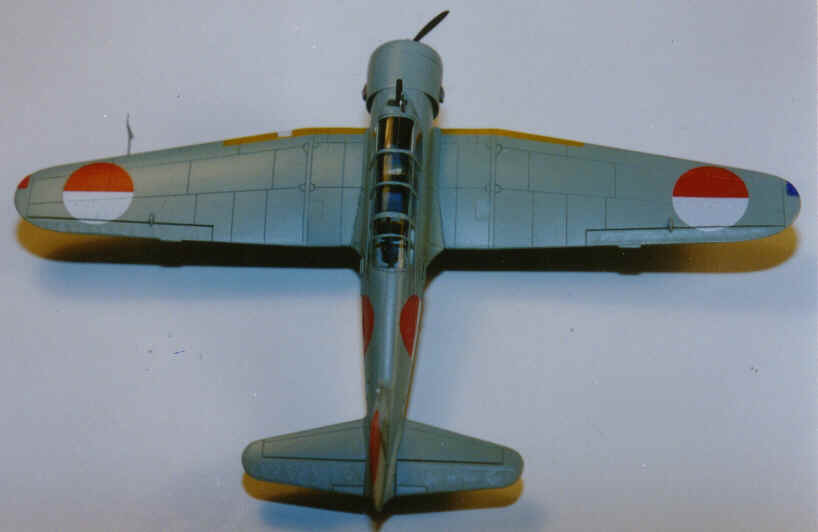
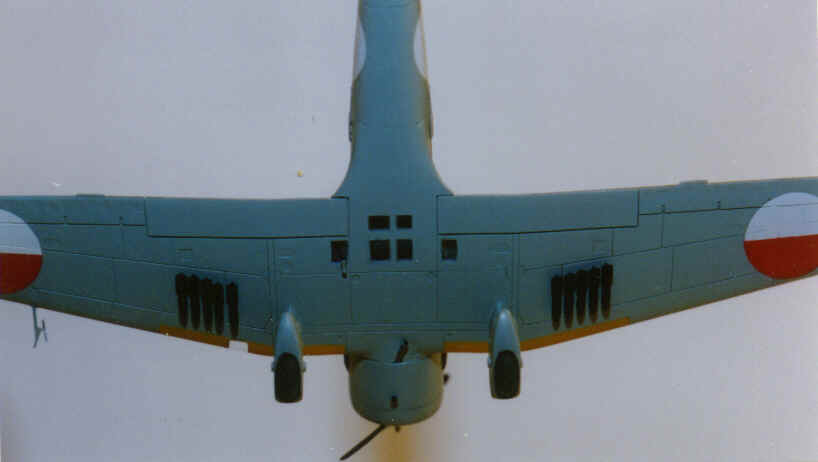
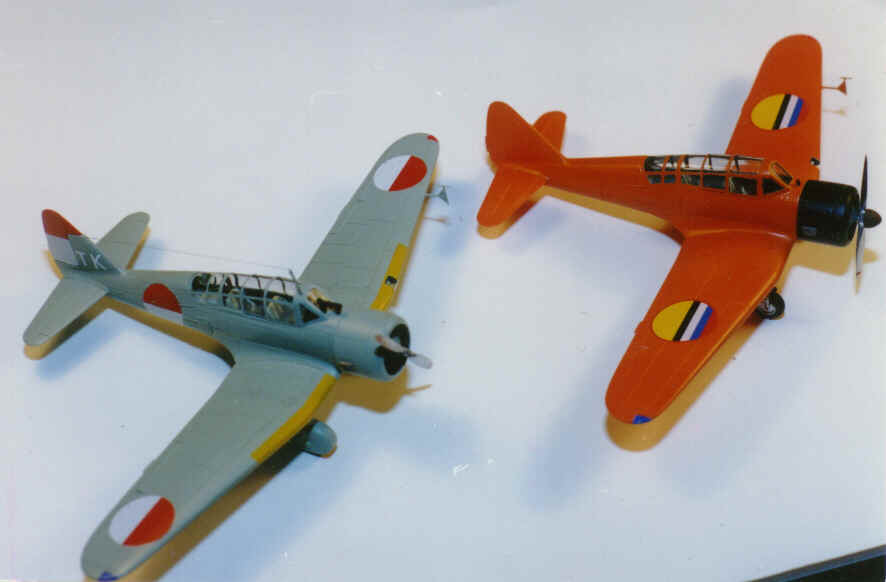
If you want to "accurize" either Ida kit, a few modifications are necessary on the wings of both kits. First, the pitot tube in both is completely inaccurate, being molded as a single long rod. The Ida pitot tubes were elaborate ' T__' shaped contraptions (see my kit photos). I scratchbuilt new ones out of brass wire and styrene. Second, underneath the port wing to the left of the fuselage centerline is a small cone shaped structure which is clearly visible in photos and also in line drawings, but whose purpose escapes me. I added it to each plane by sanding a piece of styrene rod into a cone shape (wide end of cone to rear) and attaching it with brass rod (see my accompanying Ki-36 underside photo). You'll need to check your references for approximate dimensions and location, and if anybody knows what this item is, please enlighten me! Finally, the landing light cover is molded in as part of the wing. After joining the wings with Tenax and letting them dry, I used a jeweler's saw with a very fine toothed blade to cut out the landing lights for each plane. I then boxed in the light with .005" sheet styrene, again using Tenax to weld it to the wing. After sanding smooth, I drilled a depression in the center of the light "box" and superglued a small HO railroad silver headlight into the depression. After all painting is completely finished, I use 3M transparent tape cut fractionally larger than the opening as landing light covers. If you burnish the edges of the tape with a toothpick or other blunt tool, the tape is sufficiently tacky to hold fast (I've had a couple of covers remain stuck on for over 3 years now!), however, you can ensure a seal with a minute amount of superglue on the very edges of the tape. This produces a very realistic looking landing light!
After all painting, decaling and flat coating, I painted in the navigation lights. The rear clear light is a touch of ModelMaster Chrome Silver with a drop of superglue on top. For the wing tip lights, I first masked and painted the lights ModelMaster Flat White. I then used Testor's Flat Red and the new ModelMaster RLM 24 Dunkelblau. What I do is give the bottles one quick shake to get some pigment up into the clear fluid carrier, which is of much thicker consistency than paint thinner. Brushing this very thin color on over the white gives a glossy brightened color that looks like a clear red or clear blue light cover (remember that Japanese aircraft used red and blue wing tip lights rather than red and green!).
Undercarriage - In both kits the undercarriage comes in right and left halves for each wing, so some sanding of seam lines is inevitable. Also the wheel halves are molded into the undercarriage legs, so I scribed around them to make it appear as if they were separate. This is a more involved process on the spatted (Ki-36) wheels, and I recommend waiting until you've joined the undercarriage halves but before you attach them to the wings to do so. Fujimi provided nice deep inserts in the wings for the undercarriage legs to fit into and they slotted in very nicely and were faired in smoothly with minimal puttying. The tires for both were painted with AeroMaster Tire Black, and ModelMaster Chrome Silver for the exposed wheel supports on the Ki-55.
Decaling and Painting - I'm probably like you in that this is my favorite part of my modeling projects! I don't really build too many Japanese aircraft because, frankly, the solid gray or green over gray schemes are BORING! When I start a Japanese project, it's always with an eye to some bright or different color scheme.
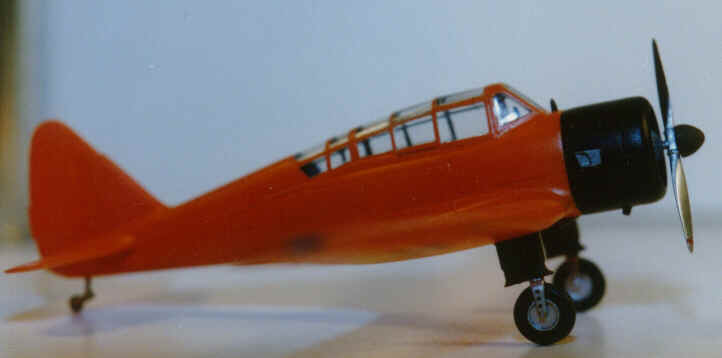
The Ki-55's were naturally colorful. Being trainers, they were finished in bright orange, with black or brown undercarriages and prop spinners, and a black cowling. Through my membership in the Small Air Forces Clearing House (a GREAT deal, by the way! If interested, please e-mail me for info), I recently came across a new decal company called Axis Decals, which had released a 1/72nd scale set of Manchukuo (Manchurian) Air Force markings for the Ki-27 Nate, and the Ki-36 and Ki-55, along with excellent color and marking placement instructions. The combination of the multi-colored national insignia and the trainer colors was my choice for my Ki-55. I used Model Master Flat Black for the cowling, Leather for the undercarriage legs, and Floquil Roof Brown for the spinner. The biggest difficulty came in selecting the trainer orange. There are MANY opinions on what shade this might have been, varying from a bright a red-orange to a dull yellow ochre. Whatever shade it was, it's apparent from old photos that it was bright. Using color chips published in Thorpe's Japanese Army Air Force Camoflage and Francillon's Japanese Aircraft of the Pacific War book, I matched their orange exactly with ModelMaster's new International Gloss Orange. It's a nice bright orange with just a hint of red in it. Even though it was a gloss, which I dread airbrushing, it went on beautifully and smoothly. The decals are excellent, but VERY thin (like Propagteam decals). Do NOT use SolvaSet, it's too strong and will destroy the decals! I used Microscale's MicrSol to set the decals. I used a very light brushing of orange pastel chalks to accentuate the panel lines.
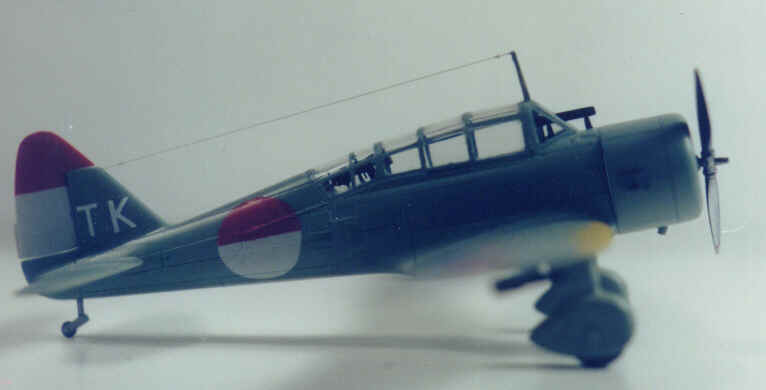
In contrast, the Ki-36's were usually drably marked in overall Japanese Army Gray-Green. The box art on the Fujimi kit showed a heavily mottled dark green over gray version, but I haven't found any pictures to support this scheme. While leafing through Thorpe's book, near the last few pages I saw some photos of some Ki-36's that had been taken by the Indonesian Air Force at the end of WWII and used in their insurgency against the Dutch. While the a/c was the overall gray-green, the Indonesian markings of a half-red/half-white roundels and rudder were striking. I couldn't find any decal sets for Indonesia so I made my own (much as the Indonesians did, they simply painted the lower half of the hinomarus white!). I cut Japanese insignia in half and placed them over solid white disks, and used some dry transfer letters for the tail codes. I used ModelMasters new Japanese Army Gray-Green. It's actually a semi-gloss and went on beautifully, but I could not get decals to adhere without an application of Testor's Gloss Coat.
Both Ida projects were quite enjoyable and with the various modifications I made, took about 25 hours apiece to complete. The fit of the kits is excellent all around, with only the cowling presenting any fit difficulties. With the different markings, both finished kits are quite eye-catching. The Ki-36 just received a 1st place award out of 24 entrants in a local IPMS show, so Iguess others agree with me!