Yup, I have pulled this
beast out many times to look it over - and put it back just as many times
(stifling a gag reflex each instance!), but finally decided to ‘bite the
bullet’ and build it, because I love this old warhorse and because it’s
big, ugly and Japanese.
Now, for those of you
raised on the likes of Hasegawa’s *newer* series of kits (for example)
their 1/72 Fw 190’s, or, their new Helen & Nell Japanese bomber’s,
it’s probably inconceivable that Hasegawa did produce some crude kits (by
today’s standards) at one time - and that’s what this old “Mavis”
tub is.
This model is a
contemporary with Hasegawa’s other big Japanese 1/72 kits such as their
G4M1 “Betty”, “Rita” and “Emily” (also a big Kawanishi flying
boat), and they all date from about the mid sixties.Thirty plus year old toolings to be sure.And crude they are!
I started by gathering
together all of my references on this monster, which unfortunately amounted
to only a few sources.Begging
to friends for info began right away.
Once I had enough stuff
to proceed with some small amount of confidence, then I started cutting
plastic….. (note for a full walkaround look with 17 photos, click
here)
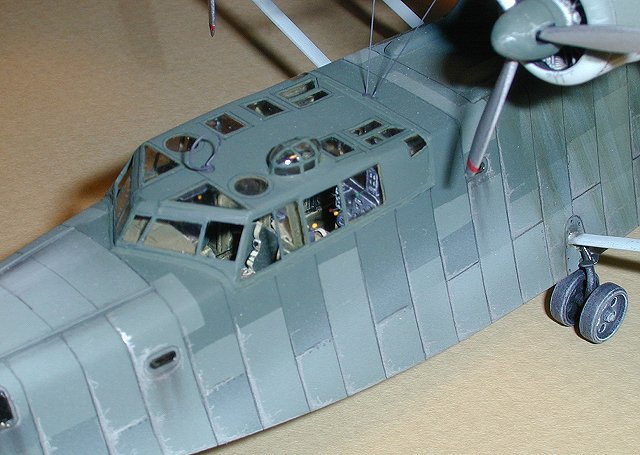
Cockpit first.
I found two ‘fuzzy’
interior photographs in one of the old three volume boxed set books from
Koku-Fan illustrated, so those provided the general cockpit arrangement.Other detail was modeled after “Emily” cockpit photographs and
detail drawings - after all, they’re both big four engine Japanese flying
boats by Kawanishi!
This kit has little
detail (none on the sidewalls), and what is provided is mostly wrong, or so
horribly out of scale as to be unusable.Break out the Evergreen plastic strip stock and go to work on
the sidewall/stringer structure. Follow this up by cutting the cockpit
floorboard lengthwise down the middle (the real thing had a depressed
walkway area). Build that walkway in, and add the various raised areas,
floor ribs, etc.
Throw away the seats
(thick ‘slabs’ as provided) and vacform new ones.Also build a new control column wheel structure from plastic rod
(much thinner than the kit provided one), and spend some time thinning the
actual control wheels down to scale.
Fit in the myriad of
radio box sets, piping and wiring from more plastic card, strip, rod and
real electrical wire (with the insulation stripped from the stranded type -
separate the strands).
This can be repeated
with the tail position to a certain degree, adding the gun mountings and
ammo storage, etc.
These two areas can
then be painted, dark washed and dry-brushed (in layers) as is my usual
cockpit painting treatment. You know, you put some stuff in, paint, wash
& dry-brush, put some more stuff in, then paint, wash & dry-brush
some more, and so on until it’s all there! - the “layered” approach.
The nose position and
‘waist’ positions are not going to have their insides be visible anyway,
so put in some quick “interior stuff” to give the right silhouettes when
the ‘ol contest judge shines his flashlight in there so the right
impression is given - it’s all about ‘impressions’ anyway, right?
I also put in some
black painted figures in these two positions (over the protests of
Copeland!). These guys will look good in silhouette, but won’t really be
visible in any kind of detail.
Let’s move on
to the engines, propellers, exhausts and cowlings:
The engines provided
aren’t really too bad, but lack detail, and will be hard to make look
exceptional. I replaced them with “Engines & Things” #72126 which is
another 14 cylinder Mitsubishi engine of approximately equal looks. So I had
my local plastic’s pusher (Herr Roll of Roll models) order four of these
suckers for me.
The propellers are
usable, but if you go with a ‘spinnered’ Mavis (like I did), then
you’ll need replacement spinners, because the kit items are too thick, too
pointed, and have no ‘rear’ closure to them.I substituted four old Airfix Ju88A spinners from the spares box -
appropriately modified - and put these aside for painting later.
The exhausts are two on
the top of each cowling, the kit ones are separate but too small, and need
replacement with sections of hollowed plastic rod cut to shape, angle
and length.
The cowlings involved
the most work, as they need the intake on the top hollowed out (provided as
closed off),and the cowl flaps cut out and repositioned in operating
positions. Ok, ok!, replacing the cowl flaps is not mandatory, but it looks
a lot better.Take your X-Acto
saw and go to it on each side, preserving the intake and exhaust cowl
protrusions at the center top and center bottom.Use .010 sheet cut to length and make new cowl flaps and position
them with liquid glue. The two top ones have cut outs for the two protruding
exhaust stacks. The intake, once hollowed out, can be filled in with a small
section of photo etched screening cut to fit.
The flaps and control
surfaces come separated in this old kit, so that’s kind of nice. Clean
these up, sand down the rivets & overdone fabric surface detail - not
down all the way, just soften it up a lot.Re-scribe panel lines (I use a sharpened old dental
instrument I got from “Micro-Mark” tools through the mail).
Repeat this process on
the wings, and fuselage surfaces (once the fuselage has been glued together
and set solidly).I use a clear
flexible plastic ruler, cut to 6” length as a scribing guide.
The canopies:
Falcon makes a vacform
canopy replacement set for this kit (trust me, you *DON’T* want to use the
kit’s clear pieces provided, as they’re really thick and not very
clear).
So get you hands on
this set and cut them out to fit like a glove (which they happily do).
You’ll have to fare
in the main canopy prior to painting the overall color because it comes
molded with much ‘non-clear’ areas included for a more seamless
appearance.
Mask with tape and/or
your favorite liquid masking product.I
cut out all window panels that are operable to show off this large
cockpit’s interior to the maximum extent possible.
Final assembly:
As per the kit’s
instructions, except replace the rear portion of the beaching dolly with
something more to scale.
Also, I replaced the
airfoil sectioned struts provided, as these had so many ejector pin marks
in/on them as to make clean up time prohibitive. Use “Contrail” strut
stock material for this.The
smaller strut support sections can be replaced with smaller Contrail strut,
or plastic rod sections cut to fit.This
whole strut replacement process is worthwhile because it gives the finished
model much more of a ‘to scale’ appearance.
Painting,
Finishing & Weathering:
Early Mavis Flying
boats usually wore an overall IJN Gray scheme, but these planes also were of
an earlier type - having no waist position windscreen blisters, propeller
spinners and other minor differences. But modeling these would involve a
conversion project which is beyond the scope of this article.
We’ll stick to the
pacific war paints of IJN (Kawanishi) Dark Green over IJN Gray.There are many markings to choose from, but all color schemes are
pretty much the same otherwise. Some use white outlined hinormauru’s
others are plain, some use yellow number and letter markings, other white,
etc.Propellers are the dark
primer reddish brown, and/or silver finished faces with black painted rear
blade surfaces, so study the boat you want to model and plan accordingly.
I use Aeromasters IJN
series of (solvent based) enamels for the base colors. Mix a slightly
lighter shade of each (IJN Dark Green & IJN Gray) in separate jars for
use in a ‘patchwork’ weathering effect (described below).
The leading edges of
Japanese aircraft wings were at this stage of the war painted a deep yellow
color - tending toward the orange range. A common mistake is modelers using
a yellow color that’s too light, or pure yellow and not ‘deep’ enough.
Use Aeromasters Japanese I.D. yellow, or add a bit of red (very little at a
time because red is a STRONG pigment) to your favorite generic yellow paint.
Plan your weathering
colors now too. Mix a batch of ‘exhaust color’ - I use about 1/3 brown
added to 2/3rd’s black.Also,
a sun streaking/fading shade of (often) more IJN Gray to be selectively
sprayed across the top sides in the direction of flight to emulate sea spray
and sun fading on the most exposed surfaces (use photos of the real thing
for guidance here).
In addition, if your
boat has vast areas of flaked off paint, then choose your aluminum color and
plan to spray over (yes, OVER) the dark green, through masking tape
stencils, for the larger patches.Some
spray an aluminum shade first, then spray the green, and then use masking
tape to pull up actual flaked off paint - just like the real thing.Problem is, is that this almost always looks way out of scale.It’s hard to make a real life one to one effect look like
1”=48”, or 1”=72” - it just doesn’t look right to me, the flakes
are always too big, and the method lacks control over the results - sort of
a gamble.I use a Berol/Prismacolor silver colored pencil for the tiny
flaked bits for a much better scale effect.
I use this pencil for
small flaked bits and feathering in paint worn areas in addition to the
airbrush for larger areas of flaked paint. Spray the aluminum first and then
blend in with the pencil second. The Dullcote applied at the very end will
bring it all together for a uniform appearance.
Ok, now that we’ve
got the colors planned out, let’s get down to the actual application of
them.
White first;I use it for three reasons:
1)
As a general primer for sealing puttied areas.
2)As an ‘underlay’ for weak colors
like yellow painted wing leading edge areas, and,
3)
For painting “combat stripes” around the
rear fuselage, or white letters and numbers I don’t have decals for.Those I’ll mask over before the next color is sprayed, removing the
mask at the end of all airbrushing.
IJN Gray (the lighter
of the two shades you’ve pre-mixed);Spray the entire underside surfaces.When dry, mask off random panel areas not to receive the next
slightly darker IJN Gray shade. Consult photographs for the typical
distribution of lighter vs. darker areas on the boats undersides.
Spray the darker IJN
Gray shade, and when completely dry (24 hours at least) mask over this in
preparation for the topside dark green(s).
IJN Dark Green; Exactly
the same approach for the topside paint application, as for the underside.
Again, consult photographs showing the upper surfaces (usually from gun
camera footage while being shot down into the drink - the fate of all
Mavis’ when encountered by enemy fighters!).
Remember, nine times
out of ten, the color division line between the topside Dark Greens and the
underside Light Grays was SOFT edged (contrary to what a lot of lazy
modelers will tell you!), so mask this when spraying at 90 degrees to the
surface with the masks held about 1/16” above the surface.
‘Salt spray’ fading
light gray next;Again, consult
photos, and mask as necessary. Hold your masks about 1/16” to 1/8” above
the surface to insure a tight soft edge where needed.Don’t overdo this application, because it was a subtle effect.
Exhaust stains
next;
Each engine has two
exhaust stack stubs sticking out of the top rear of each engine cowling.Fill up the airbrush with your exhaust mix paint and mask the forward
portions of the cowlings not to receive the color (keep the mask slightly
above the surface so no ‘tight’ edges will be made.Spray closer to the surface at the exhaust stub raising the airbrush
as you move toward the back of the wing. This will insure the correct
pattern and relative density of the staining.
Some random and light
discoloration can be applied to the wing undersides to replicate wear and
tear from many different types of exposures. Keep it light here.
Panel Lines:
I use Berol/Prismacolor
artists colored pencils for further weathering and panel line accentuation.
I start with the silver pencil, detailing the random and patterned paint
chipping as described above. Again, look at photographs for typical wear
patterns around engines and fuel filler areas, etc.
Next, select a pencil
color to darken the models panel lines. Some modelers use an oil paint dark
wash & wipe method for this. But I think it usually leaves too much of
it’s own color behind on the main surface areas (Though fellow TCAH member
John Valo pulls off that technique & method perfectly!), so I continue
to use the colored pencils.
Use a clear plastic
straight edge so your lines remain convincing. Do the entire plane, top and
bottom.
Next, use the pencils
(a light color this time) to highlight all raised edges and corners. This is
most effective and subtle.
Oil paints mixed with
turps to dilute slightly can now be used for various and random oil leaks
and stains around the cowling and wing adjacent and to the rear of the
cowlings. Again consult photos for typical ‘leak points’ and patterns.
Apply with a very small brush, diluted oil paint and take your time for a
convincing effect. Keep the leaks tiny and many to maintain an ‘in
scale’ effect.
Gloss coats in
preparation for decals;
Decals will always
‘silver’ when applied to matte painted surfaces.This is because the decal is not adhering to the surface due to the
microscopically rough surface of the paint. We need to fill this in with
gloss to insure adhesion. Unlike most modelers, I do not spray the entire
model with an over all gloss finish.Instead, I use Polly Scale gloss cote applied with a brush to
areas that will receive decals.Dilute
the gloss slightly with water, and add a drop or two of liquid dish washing
detergent (like Ivory or equal) to improve flow characteristics. The liquid
detergent acts as a ‘wetting’ agent for any acrylic type paint.
Apply the gloss only
within panel areas, and neatly. Apply to (and slightly beyond) areas to be
decaled, as well as other randomly selected panel areas for weathering
effect. The glossed areas will be barely discernable after the dullcotingwhich accounts for the extra applications.
Decals;
The Japanese national
marking - the Hinormaru(s), was typically a deep blood red color when first
applied (not the too light & ‘orangey’ color used by many kit
manufacturers!).Red is a
notoriously unstable color when exposed to the sun, so if you’re modeling
a weather beaten boat, be sure to use hinormaru’s that are faded toward a
brownish red color, otherwise it will look terrible.Use ‘fresh looking hinormaru’s on the wings undersides
though as these would have remained in good color condition.
The old IPMS/USA sheets
were perfect for these two color types. Aeromaster makes something similar
now in 1/48 scale (what else nowadays!) which works best anyway for large
1/72 models like the Mavis.
Apply decals using the
Microscale system for best results. Wash the surfaces after the decals are
thoroughly dried (two days) to clear away any decal setting solutions
remaining - as these will cause yellowing about ten years down the line if
left in place.
Dullcote
Application;
I use Testors Model
master dullcote (lacquer based) out of a spray can (that’s right, a SPRAY
CAN!) for best results.I’ve
tried Superscale’s flat cote, Polly Scale’s flat and Microflat water
based flat finishes applied through and airbrush with consistently bad
results.These always would
either: a) Not impart a really flat finish - more of a slight satin sheen
usually results. b) Chalky deposits would often form in recesses no matter
how careful I’d be. c) And, tiny glossy spots would often get inexplicably
mixed into the finish(?!).
The Testors dullcote in
the bottle (to be applied by airbrush) exhibited the same problems as a
& c above.
The dullcote in the
spray can goes on thicker, but imparts a very matte and tends to give a
rich/deep feeling to the paintwork. Neither of these (I think desirable
traits) is available with any other product I’ve tried.Their are some precautions to take though. This stuff is very
pungent, so wear a respirator mask (I prefer Mickey Mouse) and spray out
doors if possible.Follow the
directions on the can for application.
Applied too thick and
the stuff runs, too thin and you get a spotty finish.Experimentationon something old and unwanted first (like your neighbors cat)
is recommended before spraying it on your model.
Handling is tricky with
models this big too, so do the underside first, the topsides. Try to keep
things level so the dullcote cures without running or building up in places
you don’t want it.
Pastels for
weathering;
I bought a set of
“Grays” and a set of “Earth Tone” pastels a long time ago, and there
is at least another decade of use from these left, because a little goes a
long ways.
Use a piece of
‘320’ grit (or so) sandpaper as a palette and grind a few separate piles
of pastel dust in the colors you want for each project. In the case of the
Mavis, a few grays, black, and a couple of the browns would be about right.
Use an old paint brush
, old because this process is somewhat rough on the bristles, and should be
reserved from here on out only for this kind of work (use a small one with a
pointy tip - maybe an old ’00 size).And dip and brush, dip and brush, etc. building up and feathering out
exhaust stains (adding to, deepening and refining those exhaust stains we
airbrushed on earlier), oil stains, and other miscellaneous
‘leakage’s’ from various panel line & fuel filler cap areas, and
so on.
Blow off any excess. If
you mess up, use a damp lint free cloth to wash/wipe it off, and start over.
The amount of control you have with this medium is wonderful!
Don’t try to apply
the pastels before the Dullcote. It won’t work!, or I should say; it
won’t look good, will ‘run’ the pastels, dilute the colors and also
can cause irreparable damage to the finish - which can’t be corrected
short of stripping off the entire finish and going back to the start of the
painting stage!
That’s it!, The Mavis
is a tough old bird, but a really cool flying boat!I won’t be building another one unless a better kit of this comes
out (unlikely), but if it did, I may try that conversion to the earlier
Mavis in overall IJN gray.Ooooooh!